Monday, August 21, 2017

Popular 5 Video Chat Apps That Everyone Want To Know

Today we are going to tell people through this post about some of the Amazing Social Media apps, which are called Chat Alternative Apps. This app allows users to video chat with anyone unKnown across the world, now worldwide The people of this use it to know about different countries and people. It's currently available for Android and website, today we will tell about this interactive random video chat application.
google search
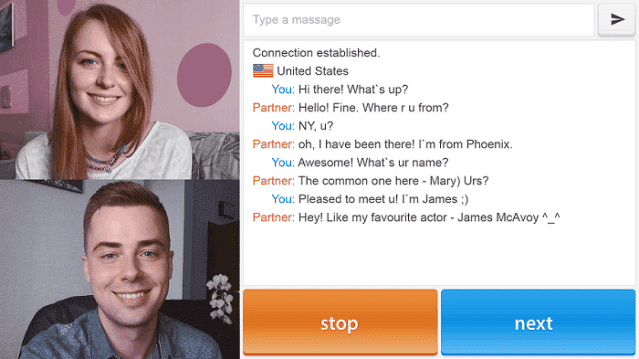
As mentioned above, it is a chat platform in which a user can video chat with anyone around the world. The one thing we would like to tell is that this is 100% free chat app and most importantly, you do not need to sign up to start a conversation (briefly you can remain anonymous). The developers of the application ask their user nothing. Here are some features of the app that will help you to understand the work.
Name of Popular Chat Alternative Apps -
  1. Camsurf
  2. Chat Alternative
  3. Omegle
  4. Holla
  5. VVid
How to use Chat Alternative Apps?
  1. It is very easy to use the user interface is very simple.
  2. Just open the app and start using it. There is no need to sign up in contrast to other chat apps
  3. Select your favorite country
  4. Click Start and the video will start chatting, if you want to change your partner click on Next button
  5. You can also type messages from the message box.
  6. If you want to end the conversation, just click on the bus stop option.
google search
Features of Chat Alternative Apps -
Free Webcam Messenger Service: This is a free service and the user does not have to pay anything.
Connect with people around the world: It helps in connecting with people around the world. Chat with different people is used in more than 200 countries and you can use country and language filter options to improve connecting and chatting. There is an option to choose your preferred country
Protect privacy: These apps maintain user privacy and allow non-names to communicate with others.
Strict rules and regulations: The company adheres to stringent rules and regulations to maintain its dignity. The different moderator team is to ensure that you are not misusing these apps.
How do you like our post, share your opinions and suggestions with us.

Micromax Evok Power price, specifications, features

माइक्रोमैक्स ने एक नए ड्यूल रियर कैमरे के साथ इवोक ड्यूल नोट स्मार्टफोन को लॉन्च किया है। माइक्रोमैक्स इवोक नोट और एक्वाक पावर नए इवोक ड्यूल नोट की सबसे बड़ी विशेषता इसकी कैमरा है। 9999 की कीमत के साथ आने वाले इवोक ड्यूल नोट 22 अगस्त से 12:00 बजे तक केवल फ्लिपकार्ट पर उपलब्ध होगा।
माइक्रोमैक्स इवोक ड्यूल नोट 5.5 इंच के पूर्ण एचडी डिस्प्ले के साथ आता है, स्मार्टफोन को मेटल बॉडी के साथ आता है। स्मार्टफोन नवीनतम एंड्रॉइड नोगाट ऑपरेटिंग सिस्टम पर चलता है और मीडियाटेक एमटी 6750 - ओक्टा कोर प्रोसेसर दिया गया है, जिसे 30 फीसदी पॉवर को बचाने और यह गेमिंग या मल्टीटास्किंग, कंपनी का दावा करता है।
कैमरा मोर्चे पर, इवोक ड्यूल नोट एक ड्यूल कैमरा सेटअप के साथ आता है। दो कैमरों में से एक में 13 मेगापिक्सेल के साथ है, जबकि दूसरा एक 5 मेगापिक्सेल के साथ आता है। बैक कैमरा भी रीयल-टाइम री फोकस विकल्प के साथ मिलकर आता है, जो उपयोगकर्ताओं को शूट के बाद एक फ़ोकस के फोकस क्षेत्र का चयन करने की अनुमति देता है, कुछ हद तक एसएलआर कैमरे के मैक्रो मोड के समान है। कैमरा भी कई अलग-अलग रंग फिल्टर के साथ आता है जैसे - मोनोक्रोम, मजबूत, ब्लैकबोर्ड, व्हाइटबोर्ड और तस्वीरें 3 डी मोड और पैनोरामा में भी ले जा सकते हैं। फोन 5 मेगापिक्सेल सेल्फी शूटर के साथ आता है, जो कैमरे के एलईडी फ्लैश के साथ जोड़ा गया है। सेल्फी कैमरा में ब्यूटी मोड के साथ कुछ फिल्टर भी शामिल हैं
फोन भी सामने वाले फ़िंगरप्रिंट सेंसर के साथ आता है जो डिस्प्ले के ठीक नीचे रखा गया है। नया माइक्रोमैक्स इवोक ड्यूल नोट दो रूपों में उपलब्ध होगा। एक संस्करण 3 जीबी रैम और 32 जीबी स्टोरेज के साथ आता है, जबकि दूसरा संस्करण 4 जीबी रैम और 32 जीबी स्टोरेज के साथ आता है। माइक्रोएसडी कार्ड के माध्यम से मेमोरी 64 जीबी तक बढ़ाया जा सकता है। 4 जीबी संस्करण नीले रंग के संस्करण में भी उपलब्ध होगा।
फोन 3000 एमएएच बैटरी के साथ है। कंपनी का दावा है कि बैटरी 260 घंटे के अतिरिक्त समय, 11 घंटे के टॉकटाइम समय और 24 घंटों के मूसी प्लेबैक का बैकअप देता है। कनेक्टिविटी के संदर्भ में, माइक्रोमैक्स इवोक ड्यूल नोट 4 जी वीओएलटीई और ओटीजी के साथ आता है।

Friday, November 13, 2015

How to Unlock Android Phone Password or Pattern Lock

How to Unlock Android Phone Password or Pattern Lock

How to Unlock Android Phone Password or Pattern Lock

How to Unlock Screen Lock


  1. Incorrectly enter your pattern for 5 times. On the fifth attempt, you will get a message informing you that you must wait for 30 seconds before you can try again. Tap ‘Next’ and a button will appear underneath the pattern grid that says ‘Forgot Pattern’. Tap on it.                                            
  2. Next, you’ll get an option to choose whether you want to unlock your phone through answering the security question that you might have set when you used your device for the very first time, or by entering your Google login details.                                                                                                         
  3. If you are using the security question, then simply type the answer of the question and unlock your device quickly. Otherwise check the Google account option and click ‘Next’. Now, provide your Google account username and password attached with your device and click on ‘Sign in’.      
  4. Once your security question answer or your Google ID is verified, you will be given an option to choose your new security lock, such as PIN code, pattern and password. Select the security option that you prefer and enter your new password or pattern.                                                          
  5. That’s it! Now you will be able to use your new security lock to unlock your phone.

How to Free Up Space On Android

How to Free Up Space On Android


  1. Uninstall Unused Applications
    If you have some apps that you no longer use on your Android phone or tablet, uninstalling them will free up some space and increase your phone performance. To do so, go toSettings -> Applications manager and uninstall the apps you don’t want.
  2. Clear App Cache
    You can also clear app’s cache on your phone. Clearing the cache removes an application’s temporary files and thus can free up some space. In order to do that, go to Settings >Applications manager, find apps that take up the most space, and then tap on ‘Clear cache’.
  3. Delete Unnecessary Files and Folders
    Most of the people leave the download files on their gadgets after use. These files consumes lot of space and your device becomes unavailable for your next downloads. Deleting unnecessary data regularly keeps your device space free. In this case, try an app called DiskUsage that helps you to find the files and directories on storage card which consume a lot of space. It displays all the information graphically, making it easy to see which files or content are eating up the most space. Just be careful to when you decide to delete something you see in DiskUsage that is what you think it is.
  4. Move Apps and Media Files to SD Card
    Moving apps and media files to your SD card’s storage would not only free up your phone’s internal storage but it also would increase your phone’s performance. To move supported apps to sd card, you can use the App Manager App . This app is free  and doesn’t require the roots access on your phone. All you have to do is install this app on your phone and you are ready to go. Please keep in mind that not all the apps can be moved to the external storage. Some apps require to be stored on the phone internal storage and they can’t be moved from there.


Thursday, November 12, 2015

Auto Scrolling Recent Posts Widget For Blogger / Blogspot

Auto Scrolling Recent Posts Widget For Blogger / Blogspot


Step 1. Login to Your Blogger Account.Go to your Blogger Dashboard.Click on Layout tab from left pane and click on Add a Gadget link..

Step 2. After click on Add a Gadget link A pop-up box will open now
with many gadget list, Choose HTML/JavaScript from the gadget options by clicking the blue plus sign for that gadget. 

Step 3. Select 'HTML/Javascript' and add the one of code given below. 

<!-- Latest/Recent Posts Scrolling Bar By Solution Mirror -->
<style type="text/css">
#exe_latespost_scrolling_bar {background: #000000;width: auto;margin: 0 auto;text-align: center;color: #F40045;border-bottom: 2px solid #000;-webkit-box-shadow: #666666 0px 1px 3px;-moz-box-shadow: #666666 0px 1px 3px;box-shadow: #666666 0px 1px 3px;z-index: 999999;line-height: 1.85em;letter-spacing: 1px;}
#exe_latespost_scrolling_bar li {display:inline;}
#exe_latespost_scrolling_bar a{text-decoration:none;color:#FFFFFF;font-size:13px;font-weight:bold;font-family:arial,"Helvetica",sans-serif;}
#exe_latespost_scrolling_bar a:hover{text-decoration:underline;}
</style>
<div id='exe_latespost_scrolling_bar'>
<script type="text/javascript">
function latestpostlistbyexeideas(json) {
document.write('<marquee behavior="scroll" onmouseover="this.stop();" onmouseout="this.start();" width="95%" scrolldelay="100" direction="left" >');
for (var i = 0; i < json.feed.entry.length; i++)
{
for (var j = 0; j < json.feed.entry[i].link.length; j++) {
if (json.feed.entry[i].link[j].rel == 'alternate') {
break;
}
}
var EXEentryUrl = "'" + json.feed.entry[i].link[j].href + "'";
var EXEentryTitle = json.feed.entry[i].title.$t;
var item = ">> <li>" + "<a href=" + EXEentryUrl + ' target="_blank">' + EXEentryTitle + "</a> </li>";
document.write(item);
}
document.write('</marquee>');
}
</script>
<script src="http://www.yourbloggeradress.com/feeds/posts/summary?max-results=10&amp;alt=json-in-script&amp;callback=latestpostlistbysolutionmirror"></script>
<noscript>Allow Your JavaScript To View This Awesome Widget. {<a href="http://www.solutionmirror.blogspot.com">+ Grab this Widget</a>}</noscript>
</div>
<!-- Latest/Recent Posts Scrolling Bar By Solution Mirror -->


Replace Red Link to your Blogger Address..

Wednesday, November 11, 2015

How to Add Background Music to Your Web Page Or Blogger

How to Add Background Music to Your Web Page Or Blogger

With Music Control
How to Add Background Music to Your Web Page Or Blogger With Music Control

Step 1. Login to Your Blogger Account.Go to your Blogger Dashboard.Click on Layout tab from left pane and click on Add a Gadget link..

Step 2. After click on Add a Gadget link A pop-up box will open now
with many gadget list, Choose HTML/JavaScript from the gadget options by clicking the blue plus sign for that gadget. 

Step 3. Select 'HTML/Javascript' and add the one of code given below. 

Paste Your Mp3 Link Which Song You Want To Play In Background 

Note - Only This Type Link Is Valid - http://www.wapdelux.com/menu/Download_Menu/Ringtone/Mp3%20Ringtone%20(up)/Daily%20New%20Mp3%20Ringtones/Tuje_Bhula_Diya_Flut.mp3

<audio controls autoplay loop>
<source src="Your Mp3 Link"></source>
</audio>

Add a Professional Author Bio Widget in Blogger

Add a Professional  Author Bio Widget in Blogger 


Add a Professional  Author Bio Widget in Blogger

Step 1. Login to Your Blogger Account.Go to your Blogger Dashboard.Click on Layout tab from left pane and click on Add a Gadget link..

Step 2. After click on Add a Gadget link A pop-up box will open now
with many gadget list, Choose HTML/JavaScript from the gadget options by clicking the blue plus sign for that gadget. 

Step 3. Select 'HTML/Javascript' and add the one of code given below. 


<h2 class='title'>Your Name</h2>
<div class='widget-content'>
<!--[if !IE]> -->
<style>
#profilevinay{
border:2px solid #888; margin:2px 5px 0px 0px; padding:2px;
}
#profilevinay:hover {
border:2px solid #ccc;
cursor:pointer;
}

.opacity  {
opacity: 0.5;
margin-left: 50px;
-moz-transition: all 0.5s ease-out; 
-o-transition: all 0.5s ease-out; 
-webkit-transition: all 0.5s ease-out; 
-ms-transition: all 0.5s ease-out; 
transition: all 0.5s ease-out;
-moz-transform: rotate(7deg); 
-o-transform: rotate(7deg); 
-webkit-transform: rotate(7deg); 
-ms-transform: rotate(7deg); 
transform: rotate(7deg); 
filter: progid:DXImageTransform.Microsoft.Matrix(
                M11=0.9961946980917455, M12=-0.08715574274765817, M21=0.08715574274765817, M22=0.9961946980917455, sizingMethod='auto expand');
zoom: 1; 
}
.opacity:hover  {
opacity: 1;
margin-left: 0px;
-moz-transform: rotate(0deg); 
-o-transform: rotate(0deg); 
-webkit-transform: rotate(0deg); 
-ms-transform: rotate(0deg); 
transform: rotate(0deg); 
filter: progid:DXImageTransform.Microsoft.Matrix(
                M11=1, M12=0, M21=0, M22=1, sizingMethod='auto expand');
zoom: 1;
-moz-box-shadow: 1px 1px 4px #000;
-webkit-box-shadow: 1px 1px 4px #000;
box-shadow: 1px 1px 4px #000;
}

</style>
   <![endif]-->

<style>
#profilevinay{
border:2px solid #888; margin:2px 5px 0px 0px; padding:2px;
}
#profilevinay:hover {
border:2px solid #ccc;
cursor:pointer;
}
.opacity  {
opacity: 0.5;
-moz-transition: all 0.5s ease-out; 
-o-transition: all 0.5s ease-out; 
-webkit-transition: all 0.5s ease-out; 
-ms-transition: all 0.5s ease-out; 
transition: all 0.5s ease-out;
zoom: 1; 
}
.opacity:hover  {
opacity: 1;
zoom: 1;
-moz-box-shadow: 1px 1px 4px #000;
-webkit-box-shadow: 1px 1px 4px #000;
box-shadow: 1px 1px 4px #000;
}
</style>


<img class="opacity" id="profilevinay" src="https://blogger.googleusercontent.com/img/b/R29vZ2xl/AVvXsEhx1yBMxjv797jTgoZG-CdiLrvYp1kPAog9_-p9KPvNDDUXqnAtcqZ3H7s25alw2GMEL7O6Lh0MozDrKLJhDDjJLlGfpQXO8NeOtKvXxg4npN1kbawvn5iXwadX8WYszHzYKLAFqfJlYAY/h120/IMG_20150228_111848+%25282%2529.jpg"  width="60px" height="60px" align="left"/>
Tell About Your Self<a href="Your Any Account Link">Continue Reading</a>  <br/> </![endif]-->
</div>